

Reimagine Your Photos:The Complete Guide to Image to Image AI
You have a solid product photo with clean lighting, but the whole thing feels flat. It lacks the moody, editorial aesthetic your brand needs. Not long ago, that problem required a pricey reshoot or a hefty invoice from a designer. Now, you upload the raw file, dial in the prompt, and watch the platform reinvent the aesthetic completely. An image to image AI generator gives you a genuinely compelling asset in about 30 seconds.
That is the real utility of AI image transformation. Tools like Whisk AI have pushed this category forward quickly. Whether you are a marketer or just a creative person with a phone camera, you don’t need to reinvent the wheel to get great visuals. The learning curve isn’t technical. It is entirely creative. The challenge lies in developing an instinct for guiding the algorithm toward an intentional synthesis rather than random guesswork.
What an Image to Image AI Generator Actually Does
Instead of asking the software to synthesize something from a blank canvas, you provide a starting point. The starting photo acts as a visual anchor, a foundational layer dictating the entire composition. The algorithm analyzes the spatial relationships and then rebuilds the frame guided by your text prompt.
Modern platforms use diffusion models under the hood. The model takes your photo, introduces controlled visual noise, and rebuilds it step by step. It reconstructs the file shaped strictly by your text prompt. The image is completely transformed by the diffusion process.
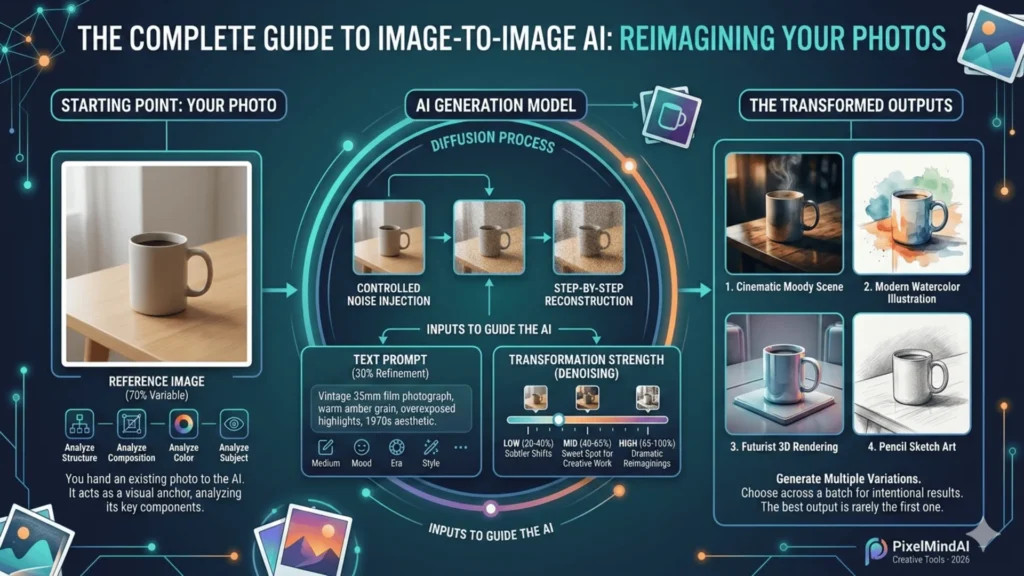
The pivotal variable here is transformation strength. This setting dictates how freely the machine reimagines the file:
- Low strength (20 to 40%): Subtle stylistic shifts are preserved in the final output. The layout stays close to the original.
- Mid-range (40 to 65%): The sweet spot for most creative work.
- High strength (65 to 100%): Dramatic reimaginings loosely inspired by your upload.
Mastering that dial unlocks the true potential of any free image to image AI generator.
The Best Image to Image AI Generators Right Now
The market is crowded right now. Whisk AI stands out by letting you input multiple reference images separately. You can upload one file for the subject, another for the scene, and a third for the stylistic feel. That three-channel input system produces highly controlled, blended outputs. For someone who has a clear visual mood in mind but can’t fully articulate it, that feature is indispensable.
Here is a comparison of the major tools available:
| TOOL | BEST USE CASE | FREE TIER | WHAT MAKES IT DIFFERENT |
|---|---|---|---|
| Whisk AI | Multi-reference creative blending | Yes | Separate subject / style / scene inputs |
| Stable Diffusion img2img | Power users, maximum control | Yes (local) | Open-source, deep parameter control |
| Adobe Firefly | Professional design workflows | Limited | Native Photoshop integration |
| Midjourney (–cref flag) | High-quality stylized art | No | Consistent character reference outputs |
| Canva AI | Social media creators, quick edits | Yes | Template-friendly, minimal learning curve |
Start with a free image to image AI generator before committing your budget anywhere. Platforms like Whisk and Canva offer excellent free access so you can test your specific workflow.
How to Use an Image to Image AI Generator Effectively
The workflow feels simple at first glance. However, getting consistently great results requires a clear strategy.
Step 1: Choose a Strong Reference Image
Well-lit photos with a clear subject work best. Avoid extreme darkness or cluttered backgrounds. The algorithm needs coherent visual information. If your main subject gets buried in background noise, crop the file before uploading. Your input aspect ratio often determines the final frame.
Step 2: Write a Specific Prompt
Vague instructions miss the mark. Skip ambiguous phrases like “make it beautiful.” Instead, prompt the specific medium and mood. Use terms like “vintage 35mm film photograph, warm amber grain.” The more precise visual vocabulary you provide, the better the result. Keep it to 20 to 40 words. Too many instructions create incoherent outputs.
Step 3: Set Transformation Strength
- Low strength (20 to 40%): Subtle aesthetic updates.
- Mid-range (40 to 65%): Balanced creative transformation.
- High strength (65 to 100%): Complete structural reimagining.
Start right in the middle at 50%, then adjust up or down based on your goal.
Step 4: Generate Multiple Variations
Run 4 to 6 generations from identical inputs. The stochastic nature of diffusion models ensures each run differs slightly. Reviewing a batch takes about 30 seconds and drastically improves your final selection.
Where AI Image Transformation Gets Most Useful
The best feature isn’t the wow factor. It is the practical time savings.
E-Commerce Product Photography
This is a tool built for rapid iteration, an asset designed to save you hours of manual editing. You capture a basic flat lay, run it through the system, and instantly receive a seasonal marketing asset. A standard coffee mug on a white table transforms into the same mug resting on a snowy winter patio. Brands use this to generate contextual imagery on tight budgets.
Concept and Architecture Visualization
Designers upload rough spatial sketches to show clients near-photorealistic interpretations. Tasks that required extensive 3D rendering now take minutes to process.
“The real power isn’t replacing photography. It’s eliminating the gap between having an idea and seeing it clearly enough to make decisions.”
Brand Consistency
You can use one beautifully styled image as a reference to unify a batch of inconsistent photos. That changes how you view these platforms entirely.
Common Mistakes and How to Avoid Them
Even with exceptional tools, certain habits lead to disappointing results.
Fighting the input image. If your reference is a soft pastoral landscape and you prompt for gritty urban street photography, the model struggles. Use the photo to set the foundation and the text to steer the mood. Work with your reference, not against it.
Expecting photorealism from stylized inputs. If you start with a cartoon illustration and prompt for a photorealistic portrait, you confuse the algorithm. Stylized inputs produce stylized outputs.
Accepting the first output. Always run variations. Even tiny text adjustments can shift an output significantly.
The 70/30 Rule: Think of the reference image as 70% of the equation and the text prompt as the remaining 30%. Invest heavily in your input photo first.
The Ethics and Limitations Worth Understanding
The creative community is still establishing norms here. Using someone else’s copyrighted image as a reference sits in a murky legal space. The safest approach is utilizing files you actually own.
Regarding limitations, these models still struggle with fine text rendering and precise hand anatomy. If you require pixel-level accuracy for technical diagrams, these tools aren’t reliable yet. For general marketing applications, the quality is undeniably professional.
Worth Noting: Transparency builds trust. If AI-transformed imagery appears in editorial contexts, disclose it to your audience.
Frequently Asked Questions (FAQs)
When diving into AI generation, a few common questions always pop up. Here are the clear answers you need regarding these tools.
Conclusion: Your Next Photo Is Already Your Starting Point
An image to image AI generator makes the photos you already have far more valuable. A mediocre shot becomes a moody editorial piece. A plain product photo transforms into a high-end campaign asset.
The technology doesn’t replace your creative vision. It amplifies it. Start with the best photo you own, dial in your transformation strength, and iterate continuously. Pick one image you wish looked different and upload it right now.


